Archive | pkg-config RSS for this section

Getting Started With GLib in Emacs

Recently, I decided to start doing some C. In the past, I’ve used GLib in my C programs, and I’m a fan. I decided that I’d like to use GLib in my current endeavors. All that said, before I can use it, I have to be able to build it. Unfortunately, nothing in my life just works, so it took some configuring.

The Makefile

In my last post, I talked about creating a Makefile, and walked through it. I forgot one huge thing though: pkg-config!

Previously in DMP Photobooth, I used pkg-config to manage my library compiler flags. To that end, let’s make some changes to the Makefile I wrote previously. First, let’s refer back to what I wrote before:

COMPILE_FLAGS = -c -g -Wall -Wextra -std=c11 $(OPTIMIZE_LEVEL) LINK_FLAGS = -g -Wall -Wextra -std=c11 $(OPTIMIZE_LEVEL) LINKER_LIBS = -lSDL2 -ldl -lGL

It’s pretty straightforward. I have a compile flag set for compiling a .o, and for compiling a program. I also have a LINKER_LIBS variable to pass to the compile command. This isn’t part of the COMPLIE/LINK_FLAGS because the sources and object code being compiled must appear first or GCC complains. Now, let’s take a look at the new snippet:

COMPILE_FLAGS = -c -g -Wall -Wextra -std=c11 $(OPTIMIZE_LEVEL) \ $(shell pkg-config --cflags $(PKG_CONFIG_LIBS)) LINK_FLAGS = -g -Wall -Wextra -std=c11 $(OPTIMIZE_LEVEL) \ $(shell pkg-config --cflags $(PKG_CONFIG_LIBS)) PKG_CONFIG_LIBS = glib-2.0 gl sdl2 MANUAL_LIBS = -ldl LINKER_LIBS = $(MANUAL_LIBS) $(shell pkg-config --libs $(PKG_CONFIG_LIBS))

Things are getting just a bit more complicated now. You’ll notice there are three LIBS related variables. PKG_CONFIG_LIBS is the list of libraries to be passed to the pkg-config command. MANUAL_LIBS, as the name implies, is a list of manually configured -l strings. For the life of me, I couldn’t figure out what to pass to pkg-config to get it to spit out -ldl, so I’m forced to do it this way.

Regardless, LINKER_LIBS now contains the MANUAL_LIBS, and the output of $(shell pkg-config --libs $(PKG_CONFIG_LIBS)) which produces the necessary -l strings for all the PKG_CONFIG_LIBS.

On top of that, I’ve added the output of $(shell pkg-config --cflags $(PKG_CONFIG_LIBS)) to the COMPILE_FLAGS and LINK_FLAGS. This will ensure that if any pkg-config library needs special compiler flags, that they get used.

Great, now that’s done. A quick make, and everything seems to be working. We’re in business! …right?

Convincing Flycheck

If only it could be that easy. I created a new source and entered the following:

#include <glib.h>

Flycheck wasn’t convinced though; it put some red jaggies under this, and a quick mouse over of the error shows that flycheck doesn’t think that file exists. I began getting deja vu. After some googling, I determined that I can add arbitrary paths to flycheck-clang-include-path (I’m using the flycheck clang checker, if you’re using gcc this variable is going to be different. I’m guessing flycheck-gcc-include-path) to rectify the issue. To do this, enter:

M-x customize-variable [ENTER] flycheck-clang-include-path [ENTER]

This will get you a customize window for this variable. I added the following:

/usr/include/glib-2.0 /usr/lib/x86_64-linux-gnu/glib-2.0/include

…and things seem to be working fine. That said, I imagine if I get more involved in the GLib stack, I’m going to have to add all of these guys:

includes

Not a huge deal, but I’ll cross that bridge when I come to it.

I Installed Something Called “Debian Unstable”

So, after weeks of procrastinating, the day finally came; it was time to upgrade Ubuntu. As many of you likely know, Ubuntu has a 6 month release cycle. New versions come out in November and April. The release of Saucy Salamander marked the first time I’ve had to deal with a Linux distro upgrade since I was running Fedora 8 back in 2008 (Not counting a brief encounter with Debian Squeeze just prior to using Ubuntu). As I recall, my attempt to upgrade to Fedora 9 was a disaster. Nothing worked, and it was a huge amount of effort. It was so bad that I decided to cut my losses and just go back to Windows Vista.

Needless to say, I wasn’t terribly excited about upgrading to Saucy. Finally, about a week ago I decided to stop being lazy and just do it. While it wasn’t quite the disaster that Fedora 9 was, I wouldn’t call the upgrade “smooth”. The first thing that I noticed was the fact that I could no longer lock the display. Since my cat likes to perform unauthorized refactoring of my code if I leave the display unlocked, this would not do. I did some googling, and it turns out that Gnome removed gnome-screensaver in Gnome 3.8. Gnome-screensaver controlled, among other things, locking the screen. All of the functionality was rolled into GDM. Ubuntu uses LightDM, so in order to protect my precious codebase I have to either switch it out for GDM, or use a Gnome shell plugin. First, I tried to install GDM, but every time I logged in I would get a popup saying that GDM crashed. I switched back to LightDM and installed the plugin. Everything seemed to be going fine, but things were just a bit more wonky. Every so often, when I’d go to unlock, the screen would freeze. I could just hope it was working and type my password and press enter to unlock it, but I like things to work right.

Not a huge deal though, I thought. I decided that I’d just grin and bear it. However, things continued to come apart. I went about re-compiling DMP Photo Booth and its modules to make sure everything was working correctly with the updated software versions. For the most part it was, but my working splash screen was broken. When shown, the window would pop, but the image on the window would not show. It seemed my call to while (gtk_events_pending()) gtk_main_iteration(); was returning early. In the course of my investigation I decided to open the Glade UI file to make sure everything was right. The only problem? The version of Glade shipped with Saucy has a major bug that causes it to crash when you open a file with a dialog in it. You can read the bug report here.

For me, this was the straw that broke the camel’s back. It was time to try a new distro.

Let’s Meet Our Contestants!

Ubuntu GNOME

I’ve been running Ubuntu for a while now, and have been mostly satisfied with it. I do have some concerns about their direction, but I’m not quite ready to break out the torches and pitch forks. However, I much prefer Gnome 3 to Unity, so I figured it was time to switch to a Gnome-centric distro. Luckily, there is a Ubuntu distro that focuses on Gnome: Ubuntu GNOME. My concern with this is that they seem to have manpower issues. I don’t feel like getting attached, just to have the rug pulled out from under me, so I won’t be using Ubuntu GNOME.

Fedora 20

I feel that it is fair to say that Fedora is to Red Hat as Ubuntu is to Debian. Fedora is an old, mainstream Linux distro that has the financial backing of a large company behind it. It is likely to be around for years to come. Better yet; Fedora is a Gnome distro. Fedora 20 ships with Gnome 3.10, the current latest and greatest.

Back in 2008, I tried to run Ubuntu. Back then, it didn’t “just work”. Fedora did. Maybe it was time to don my Fedora and come home to my first Linux distro. I downloaded the live DVD for Fedora 20, and booted it up. Everything seemed great; Gnome 3.10’s fancy new UI elements were incredibly profound. Mozart and Da Vinci would surely be reduced to tears at the sight of their magnificence. I was sold. I started the installer and got to work. I set my language, hostname, and then went to configure my partitions. …aaaaaaand no hard drives detected. Crud. After some googling around, this seems to be a known issue. The Googler told me that I could disable SELinux and it would work, but no luck. I was told that I could use the non-live image and it would work, but no luck. Well, so much for that idea. I filed my Fedora installation media in the round file and decided what to do next.

Debian Sid

It seems that the cool kids are running Debian these days. I’ve used Debian before, and had good experiences with it (uptime on my Debian Squeeze home server shows 102 days). The one sticking point is how old the software is. That is, old in the stable release; Debian Unstable has up-to-date software. The cool kids assure me that Sid is still more stable than Ubuntu or Fedora, so I decided to give it a shot.

The Installation

Installing Sid is slightly more tricky than Ubuntu or Fedora. Here’s the installation blurb on the Debian Wiki:

Use the stable installer to install a minimal stable system and then change your /etc/apt/sources.list file to testing and do an update and a dist-upgrade, and then again change your /etc/apt/sources.list file to unstable and again do an update and a dist-upgrade. ... If this seems too complicated you should probably not be using unstable.

With those words of encouragement, I set off to work. I downloaded the Debian 7 net install media, and installed. I followed the wizard, setting up the usual things. For partitioning, I formatted my /boot and / partitions, and preserved my /home partition. I spoke about this before in a previous post, but the short answer is that this keeps you from having to back up your data and settings. You should probably still do that stuff in case you do something stupid, but if all goes well you won’t need to.

When the time came to select additional software, I deselected everything. I finished the install and rebooted. The system booted up to the command line, and I logged in and su‘d to root. Now that my Wheezy install was complete, it was time to upgrade to Jessie. This is accomplished by editing /etc/apt/sources.list and changing every instance of the word wheezy to testing. While I was at it, I added contrib and non-free so I could get things like my wifi driver and flash. Next order of business was to install apt-listbugs and apt-listchanges. These two packages change apt-get to warn you of bugs in software, so you don’t blindly install some software that will light your computer on fire. After that:

apt-get update apt-get dist-upgrade

…then I ate lunch. This process will upgrade my system to testing, and it takes a while. After it’s done, I repeated the steps above, replacing all instances of testing with unstable in my sources.list. Additionally I had to delete the lines:

deb http://URL/ testing/updates main deb-src http://URL/ testing/updates main deb http://URL/debian/ testing-updates main deb-src http://URL/debian/ testing-updates main

…these don’t exist in Unstable.

While the apt-get dist-upgrade was running, it was time to watch some TV.

Finally, when apt-get dist-upgrade completed, I had a Debian Sid system. One problem: it was command line only.

A Few More Things

First things first, I needed to set up sudo:

adduser [username] sudo init 6

After the reboot, my user is set up to use sudo.

I had to install some software. First up is Gnome:

sudo apt-get install gnome

This is starts a 1.3 GB download, so I watched some more TV. When that finished, I needed to install my wifi driver so that I could disconnect my temporary cat-5 cable:

sudo apt-get install firmware-iwlwifi

Next up is the Debian laptop applications. This package installs the software that would be installed by selecting the laptop task in tasksel:

sudo apt-get install task-laptop

I rebooted into Gnome. I logged in and connected to my wifi. Since I preserved my /home partition, all my settings are still set up from Ubuntu, so there is very little asthetic configuration to be done.

The gnome package in Debian installs some other things besides Gnome. Among those things is LibreOffice, so I don’t have to worry about that. However, there are a few usability packages to install:

sudo apt-get install flashplugin-nonfree sudo apt-get install synaptic sudo apt-get install pkg-config

At this point I had a basic system set up. Now it is time to make sure DMP Photo Booth still works. Since I preserved my /home, NetBeans is still installed. However, there is no JDK installed. This was an easy fix:

sudo apt-get install openjdk-7-jdk

Now it is time to install the dependencies for DMP Photo Booth:

sudo apt-get install libmagickwand-dev sudo apt-get install libglib2.0 sudo apt-get install libgtk-3-dev sudo apt-get install cups libcups2-dev

Some of the development tools I need still aren’t installed. GCC is installed, but for some reason gdb isn’t. Also, to do work on the trigger, I’ll need avr-gcc:

sudo apt-get install gdb arduino sudo adduser [username] dialout sudo init 6

Finally, I need to install Glade to modify DMP Photo Booth’s UI:

sudo apt-get instal glade

And that’s it!

Impressions

It took me a good half of a day to get it all working, but so far so good. Iceweasel is still a thing, but mozilla.org thinks it’s the latest version of firefox, and my addons still work so I’m not going to worry about it. Plus, weasels rule and foxes drool.

Glade is working now, but DMP Photo Booth’s working screen is still broken. However, I’m beginning to think it never was really working right in the first place.

All in all, it’s been a successful load. 1 week in, and I still don’t miss Ubuntu. Hopefully Sid is good to me, and I’ve found my salvation from getting a new Distro version every 6 months.

Configuring NetBeans for GTK Development

Tired of creating console applications in C? Me too. Normally, when it comes time to create a GUI application I turn to good old Java Swing. This is fine and all, but how can I be a proper hoity-toity C programmer who scoffs at the very notion of Java if I can’t even create a proper C GUI app? Clearly, this will not do…

While I do have some experience with QT in the past, I’ve decided to go with GTK. QT is a C++-only toolkit, and I’m not a huge fan of C++. QT also introduces a bunch of magic keywords and requires the use of a special pre-compiler. Meanwhile, GTK is a C library, and requires no fancy pre-compiler. But before I can do anything, I need to configure my environment…

Code Assistance

First, the easy part. You need to make sure you have the GTK development headers installed. If you’re running Ubuntu, this is a simple apt-get:

sudo apt-get install libgtk-3-dev

Now, the hard part. First, we need to launch netbeans. Click Tools -> Options and click C/C++. Click on the Code Assistance tab. Ensure you have the C Compiler tab selected, and the correct toolchain is selected in Tool Collection dropdown. Next, open a new terminal. Enter:

pkg-config --cflags gtk+-3.0

Did you see that gigantic list of paths? You’d better believe that you’re adding all of those to your Include Directories. For each folder, you need to click Add, enter the path in the File Name field, and click Select. When you’re done, your Include Directories should look similar to this:

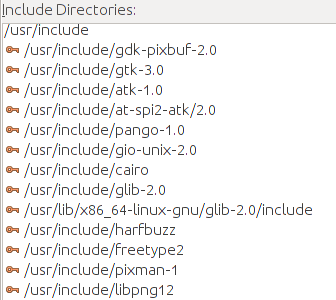
Click OK when you’re done. Now, it’s time to create a new project. Click File -> New Project… Select C/C++ and Select C/C++ Application. Click Next >. Give your project a name. Ensure that C is selected in the dropdown next to Create Main File, and ensure you have the correct toolchain selected in the Tool Collection dropdown. Click Finish.

Project Properties

Now, it’s time to configure our project properties. Right click your newly created project and click Properties. Click on Build -> C Compiler. Remember in the code completion section when we typed that command and got that gigantic list? Luckily for us, unlike Netbeans, GCC knows what to do with that. In the Compilation Line -> Additional Options field, enter:

`pkg-config --cflags gtk+-3.0`

Note that those are `back qoutes`, not ‘single quotes’. To be clear, it’s the quote located on the ~ button. Next, click Build -> Linker. In the Compilation Line -> Additional Options field, enter:

`pkg-config --libs gtk+-3.0

Note that this line is –libs, not –cflags. If you enter this command, minus backquotes, on the command line, you’ll see it give a list of libraries instead of include paths. When you are done, click OK.

Drumroll…

Open up your main.c source file. At the top of the file, enter:

#include <gtk/gtk.h>

Wait for it…

Wait…
For…
It!

Did Yellow Jaggies appear? Congratulations, you’ve come across the same problem that’s had me troubleshooting for the last 4 hours, and that’s made me give up on GTK several times before. Luckily for you, I have the solution.

Hold Ctrl+Alt and click on include. This should open up the header with the missing inclusion. Find the red jaggies. Open a terminal and enter:

sudo find / -name MISSING_HEADER.h

If the file is not located at the correct spot, try re-installing the library. However, if it is found and in the correct position, then the issue is with code completion. Return to netbeans and click Tools -> Options and click C/C++. Click on the Code Assistance tab. Ensure you have the C Compiler tab selected, and the correct toolchain is selected in Tool Collection dropdown. Locate the offending library, and click Up until it’s at the top of the group of libraries that you just added. Click OK

Did the yellow jaggies go away? Congratulations, you’re done. Otherwise, you get to keep doing this until it works.

When All of That is Done…

Now, it’s time to try it out. For now, you can just copy and paste the Hello World implementation from the GTK+3 Reference Manual. Copy and paste the whole thing, overwriting your existing main function, build it, and run it. If all is well, you should see a window like this:

Pour yourself a glass of wine, and grab a tiny piece of cheese. You are one step closer to lording over the Java Plebians!