Into The (Local) Cloud!
I, and I’m sure many of you use Github. If not, and you care to get started, I’ve written about this before. However, sometimes you don’t want to work in the open. If this is the case, then you likely aren’t going to be using Github. Sure, you can pay for private repos, or you can use alternatives like Bitbucket that provide free private repos. Personally, I prefer to keep my private things out of The Cloud (TM).
I have a headless computer hooked up to my home network running Debian that I use as a file server. I find it convenient to have my various projects that aren’t on Github in git repositories on my server. It provides a backup, and makes it easy to keep my desktop and laptop in sync. So, let’s talk about that.
Making The Repository
This is a pretty straightforward process. Much like the usual ways of making a local repository, we’ll be using git-init, however, we need to create a bare repository, otherwise we’ll have issues pushing and pulling. To do this, enter the following in the directory on the server where you want the repository to live:
git init --bare [repo_name]Where [repo_name] is the name of the repository. A folder with this name will be created in the current directory.
This repository is special; you cannot work directly in it, you must clone and use push/pull.
Meanwhile, on Our Workstation
Back on the machine where we’ll be working, we first need to clone our newly created repository:
git clone [username]@[server]:[path_to_repo]Here, [username] is your user on the server that has SSH access, [server] is the IP address or hostname of the server, and [path_to_repo] is the location of the repo on the server. When you do this, you’ll get a warning about cloning an empty repo which you can ignore. After all, of course it’s empty, you just made it!
…and guess what? That’s all there is to it! You can push and pull as normal at this point, and should be ready to go.
But DMP Guy, I Already Have A Repo!
So, you already got a repo, and you want to move it to a central server? This isn’t much more difficult. First, get the repo itself to the server somehow. I recommend SFTP:
sftp [username]@[server]
sftp> put [compressed_repo]
sftp> bye
Where [username] is an account and [server] is the server and [compressed_repo] is your repo directory compressed in your favorite manner.
After this is done, ssh to the server, then find and uncompress the repo. Next we make a bare repo out of it:
git clone --bare [orig_repo] [bare_version]Here, [orig_repo] is the original repo that you just extracted, and [bare_version] is the name you want to give the new bare version. After this is done, you can rm -rf [orig_repo], and then clone and use [bare_version] as described above.
Getting Started With Coq and Proof General
Today we’ll be talking about Coq. Coq is a dependently typed programming language and theorem proof assistant. Given that I’ve just now got the toolchain installed, I’m hardly qualified to say much more than that. However, I am qualified to talk about installing the toolchain, which is precisely what I intend to do.
To get started with Coq, you’ll need the usual things: a properly configured editor and the Coq compiler. Installing these isn’t terribly difficult. First, let’s install the compiler. If you’re running Ubuntu, this is quite simple:
$ sudo apt-get install coqAfter this is done, you should have access to the compiler (coqc) and the REPL (coqtop):
$ which coqc
/usr/bin/coqc
$ which coqtop
/usr/bin/coqtop
$ coqc --version
The Coq Proof Assistant, version 8.4pl4 (July 2014)
compiled on Jul 27 2014 23:12:44 with OCaml 4.01.0
OK! Now for the (slightly) harder part: our properly configured editor. Here we have two choices: CoqIDE or Proof General. CoqIDE is a simple IDE that ships with Coq, so if you’re satisfied with this, then feel free to stop reading now: CoqIDE comes with Coq and should be already installed at this point!
However, if you want to be truly cool, you’ll opt for Proof General. Proof General is an Emacs plugin. Unfortunately, Proof General is not available in Melpa, so we get to install it manually. Fortunately for us, Proof General is in the repos, so if you’re running Ubuntu you can just apt-get it:
$ sudo apt-get install proofgeneral proofgeneral-docThis will install Proof General, and set Emacs to load it up when you open a .v file. (My condolences to all those who write Verilog and Coq on the same machine) However, some configuration remains to be done. First fire up emacs and execute:
M-x customize-group <enter> proof-general <enter>Expand Proof Assistants and ensure Coq is selected. Now open up a .v file and behold the glory!
Wait a minute, where’s my undo-tree? My rainbow-delimiters? My whitespace-mode? It’s not your imagination, Proof General has inexplicably ignored your fancy .emacs config. This is all a bit irritating, but you can work around it by re-adding these things to the coq-mode-hook:
(add-hook 'coq-mode-hook 'rainbow-delimiters-mode)
(add-hook 'coq-mode-hook 'whitespace-mode)
(add-hook 'coq-mode-hook 'undo-tree-mode)
This is a bit of a sorry state of affairs, and if anybody reading this knows a better way I’d love to hear it. For now, I got my shinies back, so it’ll do.
Regardless, Proof General should be ready to go at this point. We are ready to continue our journey down the rabbit hole into wonderland… See you all on the other side!
Might It Be Case Sensitive?
So today I thought I’d mess around with the new SDL2 Bindings for Haskell.
I set up a cabal project and added my build-depends:
build-depends: base >=4.8 && <4.9, sdl2 >= 2, openglrawOK! Let’s do this!
$ cabal install
Resolving dependencies...
cabal: Could not resolve dependencies:
trying: gl-tut-0.1.0.0 (user goal)
next goal: openglraw (dependency of gl-tut-0.1.0.0)
Dependency tree exhaustively searched.

Note: when using a sandbox, all packages are required to have consistent
dependencies. Try reinstalling/unregistering the offending packages or
recreating the sandbox.
What is this nonsense? No possible build plan? I don’t believe it!
$ cabal install sdl2-2.0.0 openglraw
Resolving dependencies...
Notice: installing into a sandbox located at

...
OK, that works…
Maybe it’s magically case sensitive?
build-depends: base >=4.8 && <4.9, sdl2 >= 2.0, OpenGLRaw…work this time you POS! I COMMAND YOU!
$ cabal install
Resolving dependencies...
Notice: installing into a sandbox located at

...
…and of course it works…
It turns out that cabal packages can be case sensitive. Sometimes.
Getting Started With GLib in Emacs
Recently, I decided to start doing some C. In the past, I’ve used GLib in my C programs, and I’m a fan. I decided that I’d like to use GLib in my current endeavors. All that said, before I can use it, I have to be able to build it. Unfortunately, nothing in my life just works, so it took some configuring.
The Makefile
In my last post, I talked about creating a Makefile, and walked through it. I forgot one huge thing though: pkg-config!
Previously in DMP Photobooth, I used pkg-config to manage my library compiler flags. To that end, let’s make some changes to the Makefile I wrote previously. First, let’s refer back to what I wrote before:
COMPILE_FLAGS = -c -g -Wall -Wextra -std=c11 $(OPTIMIZE_LEVEL)
LINK_FLAGS = -g -Wall -Wextra -std=c11 $(OPTIMIZE_LEVEL)
LINKER_LIBS = -lSDL2 -ldl -lGL
It’s pretty straightforward. I have a compile flag set for compiling a .o, and for compiling a program. I also have a LINKER_LIBS variable to pass to the compile command. This isn’t part of the COMPLIE/LINK_FLAGS because the sources and object code being compiled must appear first or GCC complains. Now, let’s take a look at the new snippet:
COMPILE_FLAGS = -c -g -Wall -Wextra -std=c11 $(OPTIMIZE_LEVEL) \
                $(shell pkg-config --cflags $(PKG_CONFIG_LIBS))
LINK_FLAGS = -g -Wall -Wextra -std=c11 $(OPTIMIZE_LEVEL) \
             $(shell pkg-config --cflags $(PKG_CONFIG_LIBS))

PKG_CONFIG_LIBS = glib-2.0 gl sdl2
MANUAL_LIBS = -ldl
LINKER_LIBS = $(MANUAL_LIBS) $(shell pkg-config --libs $(PKG_CONFIG_LIBS))
Things are getting just a bit more complicated now. You’ll notice there are three LIBS related variables. PKG_CONFIG_LIBS is the list of libraries to be passed to the pkg-config command. MANUAL_LIBS, as the name implies, is a list of manually configured -l strings. For the life of me, I couldn’t figure out what to pass to pkg-config to get it to spit out -ldl, so I’m forced to do it this way.
Regardless, LINKER_LIBS now contains the MANUAL_LIBS, and the output of $(shell pkg-config --libs $(PKG_CONFIG_LIBS)) which produces the necessary -l strings for all the PKG_CONFIG_LIBS.
On top of that, I’ve added the output of $(shell pkg-config --cflags $(PKG_CONFIG_LIBS)) to the COMPILE_FLAGS and LINK_FLAGS. This will ensure that if any pkg-config library needs special compiler flags, that they get used.
Great, now that’s done. A quick make, and everything seems to be working. We’re in business! …right?
Convincing Flycheck
If only it could be that easy. I created a new source and entered the following:
#include <glib.h>Flycheck wasn’t convinced though; it put some red jaggies under this, and a quick mouse over of the error shows that flycheck doesn’t think that file exists. I began getting deja vu. After some googling, I determined that I can add arbitrary paths to flycheck-clang-include-path (I’m using the flycheck clang checker, if you’re using gcc this variable is going to be different. I’m guessing flycheck-gcc-include-path) to rectify the issue. To do this, enter:
M-x customize-variable [ENTER]
   flycheck-clang-include-path [ENTER]
This will get you a customize window for this variable. I added the following:
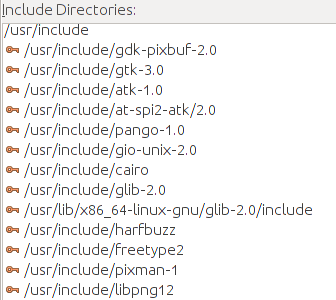
/usr/include/glib-2.0
/usr/lib/x86_64-linux-gnu/glib-2.0/include
…and things seem to be working fine. That said, I imagine if I get more involved in the GLib stack, I’m going to have to add all of these guys:
Not a huge deal, but I’ll cross that bridge when I come to it.
Checking Our Heads With Liquid Haskell
Consider this function:
headInTail :: [a] -> [a]
headInTail l = (tail l) ++ [head l]
Pretty straightforward, right? It takes a list, extracts the head and sticks it in the tail. Surely you’ve written something like this before. It should be fine, right?
*Main> headInTail [1,2,3]
[2,3,1]
…checks out. Let’s try a few more:
*Main> headInTail "hello"
"elloh"
*Main> headInTail ["cat"]
["cat"]
…good. And the moment we’ve all been waiting for:
*Main> headInTail []
*** Exception: Prelude.tail: empty list
Oh yeah, head and tail don’t work for empty lists… Normally, we have some choices on how to proceed here. We could wrap the function in a Maybe:
maybeHeadInTail :: [a] -> Maybe [a]
maybeHeadInTail [] = Nothing
maybeHeadInTail l = Just $ headInTail l
…which introduces an annoying Maybe to deal with just to stick our heads in our tails. Or, we could just do something with the empty list:
headInTail :: [a] -> [a]
headInTail [] = []
headInTail l = (tail l) ++ [head l]
…but what if returning the empty list isn’t the correct thing to do?
Another choice is to document this behavior (as head and tail do), and just never call headInTail []. But how can we guarantee that we never attempt to call this function on an empty list? Shouldn’t this be the type system’s problem?
Unfortunately, not all is roses and puppies. Sometimes the type system cannot help us. Sometimes somebody thought it’d be a good idea to use Haskell’s Evil exception system. Whatever the case, there are tools to help us.
Liquid Haskell
Liquid Haskell is a static code analysis tool that is used to catch just these sorts of problems. Liquid Haskell allows us to define invariants which will be enforced by the tool. Liquid Haskell is a research project that is still in development. As such, it has some rough spots, however it’s still very much capable of helping us with our problem here. But before we begin, we need to get the tool installed.
To install the tool, execute:
cabal install liquidhaskell…simple right? Unfortunately, we’re not quite done. We need to install an SMT solver. This tool is used by Liquid Haskell. Currently, the tool defaults to Z3. I’m not sure how to use a different solver (and Z3 works just fine), so I suggest you you Z3. You’ll have to build Z3, and place the binary somewhere on the PATH. After this is done, and assuming your .cabal/bin directory is also on the PATH, testing your source file is a simple as:
liquid [FILE].hsLet’s Have A Look
Create a haskell source file that contains the following:
headInTail :: [a] -> [a]
headInTail l = (tail l) ++ [head l]
After that’s done, let Liquid Haskell analyze your file:
liquid [YOUR_FILE].hsA bunch of stuff should scroll by, then in a second you’ll see something similar to the following:
**** UNSAFE *********************************************


 Doop.hs:5:22: Error: Liquid Type Mismatch
   Inferred type
     VV : [a] | VV == l && len VV >= 0

   not a subtype of Required type
     VV : [a] | len VV > 0

   In Context
     VV : [a] | VV == l && len VV >= 0
     l  : [a] | len l >= 0
If you go to the line and column indicated, you’ll find the argument to tail. Conveniently, it seems that Liquid Haskell comes pre-loaded with definitions for some library functions. Normally, you’ll have to define those yourself. In fact, let’s do just that.
The next logical step here is to write a specification for our function. This specification is a statement about what sorts of values the function can take. Add the following to your source file, in the line above the signature for headInTail:
{-@ headInTail :: {l:[a] | len l > 0} -> [a] @-}If you re-run liquid on your source file, you’ll see that the warning went away, and the program now indicates that your source is “SAFE”. So, what does this refinement mean?
Basically, these refinements are machine-checked comments. They have no impact on the program, they exist for Liquid Haskell. Think of it as being like an enhanced type signature. Like a normal type signature, we start with the name of the function, then two colons. This part, however:
{l:[a] | len l > 0}…should be new. Basically, this part says that the list should not be empty. You should read it as “l is a [a] such that len l is greater than zero.” A lot of the notation used by Liquid Haskell comes from formal logic. Let’s break this down some more:
l:[a]Here we bind a symbol, l, to the first list argument. At any point to the right of this symbol until the end of the scope defined by {}, we can reference this symbol.
{... | ...}The pipe symbol indicates that we are going to make some statement about the type on the left hand side.
len l > 0Here we state that the length of l must be greater than 0. It looks like we are calling a function, and we sort of are; len is a measure which is a special function that is used in specifications. However, the subject of measures is a post for another day.
You may now be thinking: “Well this is all well and good, but what’s to stop me from calling this function on an empty list?” To answer that, let’s implement main:
main =
   do i <- getLine
      putStrLn $ headInTail i
Add this to your source file, and then run liquid [YOUR_FILE].hs and you’ll notice that Liquid Haskell has a problem with your attempt to call headInTail:
**** UNSAFE *********************************************


 Doop.hs:3:29: Error: Liquid Type Mismatch
   Inferred type
     VV : [Char] | VV == i && len VV >= 0

   not a subtype of Required type
     VV : [Char] | len VV > 0

   In Context
     VV : [Char] | VV == i && len VV >= 0
     i  : [Char] | len i >= 0
Liquid Haskell is telling you that it can’t prove that the length of i is greater than 0. If you execute your main function, you should see that it works as expected. Type in a string, and it’ll do the right thing. Push enter right away and you’ll get an exception.
*Main> main
hello
elloh
*Main> main

*** Exception: Prelude.tail: empty list
…ick… Let’s fix this:
main =
   do i <- getLine
      case i of
         [] -> putStrLn "Get your head checked."
         _ -> putStrLn $ headInTail i
Now if you analyze your file, Liquid Haskell should be happy. Honestly, you should be happy too: the tool caught this problem for you. It didn’t go to testing messed up, and the bug certainly didn’t escape testing unfound. Your program is now objectively better:
*Main> main
isn't that neat?
sn't that neat?i

*Main> main

Get your head checked.Fun With Undo-Tree-Mode
No more. This ends now. This will not stand!
What’s my problem, you ask? I’ll tell you what. Emacs’ stupid undo system is my problem. Humor me for a second; fire up Emacs, and type the following:
foo
bar
baz
Still with me? Good, now press
C-x u…baz disappeared. “Well, duh! If you’re gonna whine about the fact that C-u doesn’t undo, then maybe you shouldn’t be using Emacs…” you say. Were that my issue, I’d be inclined to agree. Unfortunately, the problem is much worse. Enter the following into your buffer:
oof…then…
C-x u
C-x u
See that? Yeah… Not OK. The buffer should be:
foowith the entry of oof and bar having been undone. Instead, the buffer is:
foo
bar
baz
with the entry of oof and the undoing of the undoing of the entry of baz having been undone.
Apparently, an undo operation itself goes onto the undo stack in Emacs. Meaning that if you undo enough times, it will redo all the undone operations, then undo them again, then undo the operations before. This lets us get the buffer back into any state it has ever been in, which sounds nice on paper. In practice, it’s yet another way that Emacs goes its own way, the rest of the world be darned. And I gotta say, its pretty annoying. In a normal program, you can just hold Ctrl+u, and watch the undoes fly. In Emacs, you get to press C-x, release, press u, and release to undo one thing. Then do it again n times.
Luckily for us, this being Emacs, there is likely a better way out there.
undo-tree-mode
Undo tree mode is a minor mode for Emacs that helps us deal with this undo behavior. In the short amount of time that I’ve played with it, I’d say it makes the on-paper benefit of Emacs’ undo behavior a reality. But first, some installation.
Undo-tree-mode is in Melpa stable, however, I was unable to get it to work. To install undo-tree-mode, you can install it via Melpa, then add the following to your .emacs file:
(global-undo-tree-mode)Unfortunately, when I restarted Emacs, I got the following error:
Symbol's function definition is void: global-undo-tree-modeAdding:
(require 'undo-tree)does nothing to alleviate this situation, neither does opening undo-tree.el and entering:
M-x byte-compile-fileHowever, I was able to install it manually. First, I deleted all the files for undo-tree-mode from my .emacs.d/ directory. Then I downloaded the current version of the plugin from the author's website, and placed it in my ~/.emacs.d/, naming it undo-tree.el. Finally, I added the following lines to my .emacs file:
(add-to-list 'load-path "~/.emacs.d/")
(require 'undo-tree)
(global-undo-tree-mode t)
That first line is only required if you haven’t already added it elsewhere. Restart Emacs, and you should see that the Undo-Tree minor mode is active.
Climbing The Tree
Now, let’s try that previous sequence of events.
foo
bar
baz
C-x u
A new window should appear with the following in it:
s
|
|
o
|
|
o
|
|
o
|
|
o
|
|
x
Neat. This represents the operations that you did. Try clicking through them (you can also use the arrow keys to browse). Each node is a state of the document, x is the current state, and s is the initial state. Select the node two nodes up from the leaf to undo entry of baz. Lets continue our sequence:
oof
C-x u
You should see a new tree that looks something like this:
  s
  |
  |
  o
  |
  |
  o
  |
  |
  o
  |
  |
  o
  |
 / \
x   o
    |
    |
    o
If you click around the tree, you’ll see the various states of your buffer. You’ll see that it is simple to restore any previous state of the buffer.
Now this is something I can get used to!
Giving Emacs A Shot
For the last year or so, I’ve been using GEdit to write Haskell code. It’s worked pretty well for the most part. Haskell is a pretty simple language, and thanks to the REPL, I find myself not really missing most fancy IDE features. However, GEdit has its limitations. While GEdit has plugin capabilities, they are somewhat limited in what they can do. Additionally, there doesn’t really seem to be a vibrant plugin culture. Most people just use what Gnome provides, and that’s mostly sufficient. Put simply: I’ve made do. Honestly, I had a pretty effective setup: With my file browser on the left, and my built-in terminal on the bottom, I had 95% of what I needed. However, one always wants more.
Recently, I started at UCSD, and if any of you are familiar with its Computer Science program, you’ll know that they push Vim. They push it Hard; deep down your throat. They have basically an entire class dedicated to learning Vim, and programming assignments are set up in ways that break IDEs. Due to this, I’ve had plenty of time to consider my editor choices. So far, I’ve worked around these issues; using NetBeans to code my C, C++, and Java like a civilized person. However, I can’t help but feel that I’m swimming up river. Surely my life would be easier if I gave in.
Don’t get me wrong, I don’t care for Vim. I learned to use Vim over ten years ago in my various sysadmin jobs, so it’s not that I don’t know how to use it. I’d just rather not. Sure, for a quick edit to a file at the command line nothing beats Vim. However, I find the idea of trying to use a command line editor for a large software development laughable. I’m a fan of the GUI. Keyboard shortcuts can save time, but at some point the brainpower you devote to remembering the correct incantation for an operation you perform maybe once a week could be better spent solving some software engineering problem.
Now I know what you’re probably thinking: “But Mr. DMP-Man! Emacs is a command line editor fraught with arcane keyboard combinations, each more inscrutable than the last!” And you’d be right. However, I feel that Emacs has more effectively made the leap into the 21st century. It’s GUI isn’t the greatest, but I give it the edge. Additionally, since all editor functions are just elisp functions, and you can call them by name and by shortcut, it supports discovery more effectively. Where in Vim, you’re likely going to turn to google to tell you how to do something, in Emacs, you can just do M-x foo-do [TAB] and get a list of things that are probably what you want. In short, I can learn a few incantations if the benefits are worth it.
But I digress: the point of this post is not to proclaim what editor you should use. Some people like Vim, some people like Emacs, some people don’t care. All three are valid points of view, and there is no objective right answer.
What Benefits?
So, what compels me to give Emacs a shot? The vast library of plugins, of course. I spent a few days configuring plugins for Haskell development, and I do believe I’ve settled on a setup that’s going to improve my productivity. I’d like to share my findings.
Most of what’s in here is inspired by this excellent tutorial by serras.
But First…
Before we get started, we need to add a repository to Emacs. Emacs comes with a built-in repository system, similar to what you’d find in your favorite linux distro. However, this repo is more Debian than Ubuntu; it’s missing a lot of stuff. Thankfully, the community has stood up more robust repositories. The two big ones are Marmalade and Melpa. You can use both, or one or the other.
I settled on Melpa, of which there are two: melpa and melpa stable. Some bad experiences with Debian Sid, I’ve learned to stick with stable repos.
Either way, go ahead and add a repo to your Emacs, and you’ll have a much better selection of plugins. To setup melpa-stable, add the following to your .emacs file:
(require 'package)
(add-to-list 'package-archives
             '("melpa-stable" . "http://stable.melpa.org/packages/") t
haskell-mode
Of course something called haskell-mode would be a good candidate to download for Haskell development. Haskell-mode provides quite a bit of functionality: syntax highlighting, formatting help, and integration with quite a few external programs to facilitate development. haskell-mode can be installed from Melpa.
Details on configuring this can be found in Serras' tutorial
For indentation, I recommend the hi2 plugin mentioned in the tutorial. It provides visual cues as to where the tabs are located, and the behavior is much less wonky than the basic haskell-indentation
ghc-mod
The next thing to install is ghc-mod. ghc-mod Provides integration with GHC. Most notably: ghc-mod provides IDE-style error and warning messages inline with your source file! It also provides simple code completion, and is required infrastructure for a lot of other plugins. Recommended.
Unfortunately, it takes a bit of configuration. Check Serras' tutorial for more info.
whitespace-mode
Lately, I’ve become a fan of the 80-columns rule. I used to think that it was silly in this age of widescreen monitors. However, I’ve been forced to abide for the last quarter, and I’ve realized that it helps readability. Additionally, Haskell code tends to slide to the right thanks to extensive indentation. Due to this, some discipline is good to keep the left half of your screen from being filled with whitespace characters.
GEdit has a feature that it shows the 80th and beyond in a different shade than the first 79. Unfortunately, EMacs is somewhat lacking in this department. However, whitespace-mode serves just fine in this case.
It doesn’t mimic the GEdit behavior, but it can be configured to highlight code that goes past 80 columns. To enable whitespace mode for programming modes, add the following to your .emacs:
(add-hook 'prog-mode-hook 'whitespace-mode)whitespace-mode can be configured using the visual customize functions within Emacs. Enter M-x customize-group [ENTER] whitespace [ENTER] to access the visual customization. I have mine set up to put a dreadful red box around anything that passes the 80th line:
rainbow-delimiters
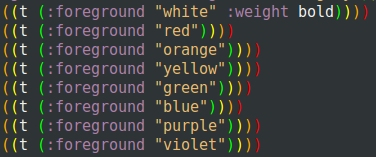
rainbow-delimiters is a plugin that color codes matching parenthesis. It’s pretty simple, but it can help greatly when working with lots of matching brackets.
Configuration is simple using the visual customization: M-x customize-group [ENTER] rainbow-delimiters [ENTER] should get you going. rainbow-delimiters can be found in Melpa.
In Conclusion
My journey with Emacs has just begun. Maybe I’ll fall off the wagon, maybe I’ll become a Priest of the Church of Emacs. Either way, I’m sure you’ll likely hear about it here!
Configuring NetBeans to Use a Build Host
So, tell me if you’ve heard this one before: you’re sitting there programming for some customer, minding your own business. But guess what? The requirements for your program depend on some platform-specific behavior. Behavior that your computer doesn’t mirror. Say, the requirements depend on the fact that 0x80000000 < 0, but you have a 64-bit compiler installed. This means that you have to test your program on their computer using their compiler. Irritating, right?
Sure, you could just sftp your code to their computer and then compile, while doing the actual development on your computer, but that sounds like so much work, right? Not as much as you’d think, thanks to NetBeans.
Enter The Build Host
With NetBeans, you can configure a Build Host, and use a remote server for compilation. Got SSH access to a user account on the build host? Got internet access? Copied the source to your computer? Then we’re set, let’s fire up NetBeans and get to work.
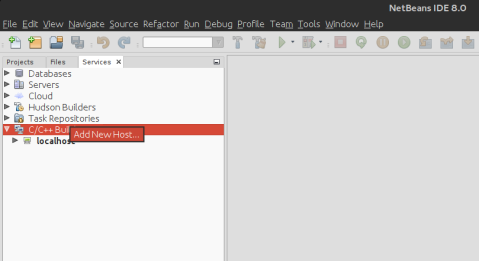
First, we need to set up the build host. On the left pane that normally shows your project source files, there should be a Services tab. Click on it. In the Services pane, right-click C/C++ Build Hosts and click Add New Host...
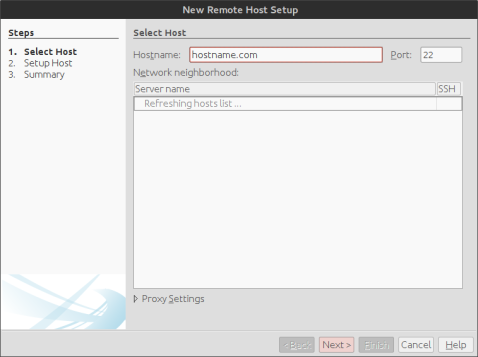
In the Hostname: field, enter the FQDN of the build host. Click Next >
Next, enter your username in the Login: field. Click Next > and you’ll be prompted to enter your password. Finally, NetBeans will attempt to connect to the build server.
Assuming all is well, you should be presented with the Summary page. On the Summary page, ensure the correct tool collection is selected, and set the Access project files via: combo box to SFTP. We can’t use Samba/NFS because that would require root on the remote server which we almost surely don’t have. When we’re done, click Finish.
Creating The Project
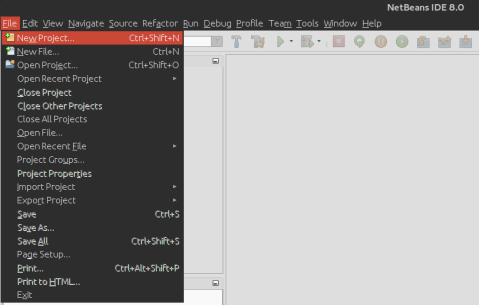
Now we’re ready to create a new project. This is a pretty straightforward process. First, click File -> New Project...
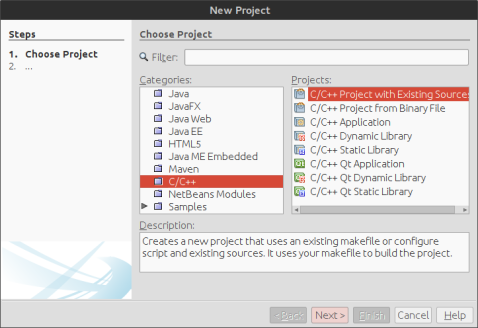
Select C/C++ -> C/C++ Project with Existing Sources and then click Next >
On the Select Mode page, select the local directory containing your source files. In the Build Host: combo box, select the build host we just created. Finally, click Finish
The project will make clean and then make. This process will take slightly longer than usual, due to the fact that your sources are being SFTP‘d to the build host and build there.
NetBeans will create a .netbeans directory in the home directory of the user used to connect to the remote server. This is where it stores the remote sources and files. However, this is largely irrelevant to us; we can treat it like a local project, and let NetBeans deal with all this clerical work!
Fixing GEdit’s Unconfigurable Terminal
Lately I’ve been distro hopping. Between projects and lacking inspiration, I’ve been in search of a new DE and a new text editor. I’ve come to realize that I don’t have the patience to deal with XMonad and friends, and of the mainstream DE’s, I like Gnome 3 the best.
However, that still leaves the question of the text editor. I’ve been using GEdit to do Haskell, and it’s been working for the most part. However, while GEdit supports many languages by way of GtkSourceView, it doesn’t support them all. What if I decide to learn some fringe langauge?
Of course a google search for “GEdit fringe-lang syntax highlighting” turns up “Use EMACS” or “Use VIM”. I’ve some experience with VIM from my past life, and I’ve tried to get into EMACS in my new life. Neither of these are terribly appealing. Which leaves me with GEdit for the time being.
So today, determined to do something productive, I fired up GEdit for the first time since reloading Ubuntu GNOME and was greeted with this:
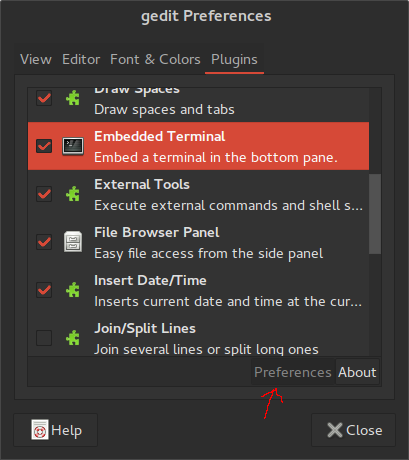
Yeah… Vaguely remembering dealing with this issue before, I went into the module preferences and tried to configure the build-in terminal.
Irritating… After some googling, and message-board hopping, I found the answer. So that I don’t have to figure this out again next year, I’d like to preserve the solution here.
The Fixing
The fix is pretty simple. First, launch dconf Editor:
If this isn’t installed, it should be in your distro’s repositories. On Ubuntu:
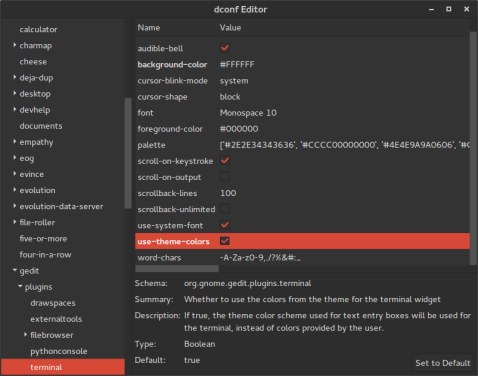
sudo apt-get install dconf-editorBrowse to org -> gnome -> gedit -> plugins -> terminal.
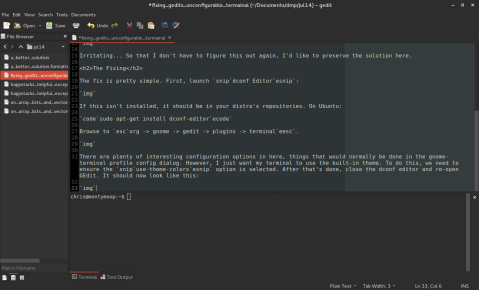
There are plenty of interesting configuration options in here, things that would normally be done in the gnome-terminal profile config dialog. However, I just want my terminal to use the built-in theme. To do this, we need to ensure the use-theme-colors option is selected. After that’s done, close the dconf editor and re-open GEdit. It should now look like this:
I now have a nice, well-behaved embedded terminal. Much better!


